The links below are for all the .PDF files thus far for the 2016-2017 year.
Beginner Group Binder Cover Page
Beginner Group Introduction Pages
Beginner Group Lesson Plans:
September - Session 1, What is a Robot, Light Emitting Diodes, Circuits
October - Session 2, Animatronics, Uncanny Valley, Interactive Halloween Mask Decoration
November - Session 3, Magic Mirror, Temperature and Gas Environmental Sensors
January - Session 4, Light Detector (Photovore) and Infrared (Collision Detection) Smart Car
February - Session 5, Ultrasonic Sensor Self Driving Smart Car
Advanced Group Binder Cover Sheet
Advanced Group Introduction Pages
Advanced Group Lesson Plans:
September - Session 1, Robot Refresher, Intro to Programming, Flashing LEDs and Arduinos
October - Session 2, Animatronics, Uncanny Valley, Interactive Halloween Mask Decoration
November - Session 3, Magic Mirror, Temperature and Gas Environmental Sensors
January - Session 4, Light Detector (Photovore) and Infrared (Collision Detection) Smart Car
February - Session 5, Ultrasonic Sensor Self Driving Smart Car
(This page will be updated with new links next month.)
If you are looking for the 4-H APR forms, here's a link:
http://4h.ucanr.edu/Resources/Members/RecordBook/RBResources/
http://4h.ucanr.edu/files/220272.docx
Thursday, March 16, 2017

Monday, November 7, 2016
Barnes and Noble Mini Maker Faire 2016
Had a great time meeting everyone! I'll be posting details about the Laser Harp in a few days, so stay tuned.
-Jason
jasongroce@live.com
-Jason
jasongroce@live.com
Thursday, September 8, 2016
Schematics for the Year to Come - 2016-2017 4-H Robotics
Greetings, come in, join me as I spin you a tale. A
tale of wondrous technological wizardry, artificial intelligence, and
scientific wonder. We begin our journey in just a few short days, and I
would hate for you to miss it!
(Dates subject to change)
September 17th, we will learn of light and wires,
and the tale of how the magical properties of crystals empower everything we
use today.
October 15th, we explore the theory behind the
fear of robots, and we implant digital life in an empty shell.
November 19th, an exploration of the sense of
smell, our new robot will hide behind the looking glass and tell us just how
“fair” is our air.
December 17th, we begin the exploration of
self-driving vehicles, starting with the “Photovore.”
January 21st, continuing our vehicular designing,
we embrace the gift of sight and introduce collision avoidance.
February 18th, adding auditory sensory
capabilities akin to the whale or bat, our intrepid bot takes on a more rugged,
and shall I say, handsome appearance.
March 18th, ready, set, go! We will be
racing our little smart ‘bots at the Art and Design Day event at the Lakeside
Rodeo Grounds!
April 15th, command your robot to submit to your
will, remotely control its actions, and customize your final builds.
May 20th, Don’t have a time machine to turn back
time? No problem! We’ll be doing a make-up session to get us ready
for the East County Junior Fair!
For those revisiting these ventures, we have plans to
expand, improve, and further explore the inner workings of the robot senses and
mind.
We have many events to enjoy and participate in during the
coming months, and I would hope to entice a few volunteers for one in
particular.
October 1st and 2nd, the San Diego
Maker Faire will be held in Balboa Park. I’ll be walking around, talking
tech and enjoying the Faire, and I’d love some company. http://sandiego.makerfaire.com/
November 5th and 6th, the Santee
Barnes and Noble will be holding a Mini Maker Faire, and we will be
displaying our club for the public. If you have the time, please
spend it with us as we show off projects from this and past years, as well as a
few extra surprises and activities for our volunteers and the public to enjoy! http://www.barnesandnoble.com/h/makerfaire
December 3rd, the San Diego STEAM Mini Maker Fest
will be at the Del Mar Fairgrounds. This is the best educational faire
for Science, Technology, Engineering, Art & Mathematics that I have seen in
San Diego County. We won’t have a booth this year, but I definitely will
be attending, and I think all of you would really benefit from it and enjoy it,
too! http://www.sansmf.org/
I would not be so bold as to promise you mastery over all
that is electronic, but should you endeavor to do so, you might enjoy the
acquisition of some level of technological prowess to flaunt amongst your
peers. What do you say? Will you follow me down the rabbit hole?
Your professor of artificial apparatus,
Jason Groce
“The electric things have their lives, too. Paltry as those
lives are.” – Philip K. Dick, Do Robots Dream of Electric Sheep
2015-2016 Lesson Plans
As one year closes, yet another begins!
See below for the lesson plans for last year:
http://jasonmgroce.webs.com/2015-2016_Advanced_Lesson_1.pdf
http://jasonmgroce.webs.com/2015-2016_Beginning_Lesson_1.pdf
http://jasonmgroce.webs.com/2015-2016_Beginning_Lesson_2.pdf
See below for the lesson plans for last year:
http://jasonmgroce.webs.com/2015-2016_Advanced_Lesson_1.pdf
http://jasonmgroce.webs.com/2015-2016_Beginning_Lesson_1.pdf
http://jasonmgroce.webs.com/2015-2016_Beginning_Lesson_2.pdf
http://jasonmgroce.webs.com/2015-2016_Advanced_Lesson_4.pdf
http://jasonmgroce.webs.com/2015-2016_Beginning_Lesson_4.pdf http://jasonmgroce.webs.com/2015-2016_Beginning_Lesson_5.pdf http://jasonmgroce.webs.com/2015-2016_Beginning_Lesson_7.pdf
http://jasonmgroce.webs.com/2015-2016_Beginning_Lesson_8.pdf
http://jasonmgroce.webs.com/2015-2016_Beginning_Lesson_4.pdf http://jasonmgroce.webs.com/2015-2016_Beginning_Lesson_5.pdf http://jasonmgroce.webs.com/2015-2016_Beginning_Lesson_7.pdf
Monday, November 30, 2015
Lesson 3: Piezoelectricity: Crystal Power, Good Vibrations, and Talking Rocks
2015-2016_Beginning_Lesson_3.pdf
2015-2016_Advanced_Lesson_3.pdf
Tuesday, October 20, 2015
Lesson 2: Animatronics & The Uncanny Valley
Below is the PDF download links for Lesson 2 for this year's book:
2015-2016_Beginning_Lesson_2.pdf
2015-2016_Advanced_Lesson_2.pdf
2015-2016_Beginning_Lesson_2.pdf
2015-2016_Advanced_Lesson_2.pdf
Lesson 1: What is a Robot?
Below is the PDF download links for Lesson 1 for this year's book:
2015-2016_Beginning_Lesson_1.pdf
2015-2016_Advanced_Lesson_1.pdf
2015-2016_Beginning_Lesson_1.pdf
2015-2016_Advanced_Lesson_1.pdf
Automatons: The Uncanny Valley, and our Halloween Prop (Videos)
Automaton: Part 1, the Uncanny Valley
-----------------------------------------------------
Automaton: Part 2, Interactive Halloween Props
In this project, we are using an Arduino microcontroller to make an interactive Halloween decoration from a mask with color changing LED eyes and a distance sensor connected to a voice recorder/player module.
Monday, October 5, 2015
San Diego Maker Faire 2015 Speech
I was approached by James Newton, the coordinator for the exhibitors in the Air and Space Museum, to fill in to give a 10 minute speech about Making.
Sunday, October 4, 2015
Maker Faire Displays
Not a lot of time right now, as we are showing at the Maker Faire again today as well. So, here's a short breakdown of our displays at Maker Faire. I will go into much further detail later this week for each one.
Feel free to email me at jasongroce@live.com if you have any questions or would like more information.
Banana Piano
Capacitive Touch Arduino Musical
Instrument
Using an Adafruit
MPR121 Capacitive Touch Arduino Shield connected to an Arduino, a speaker, and
some fruit,
this simple device demonstrates capacitive touch sensors in a fun, tactile way.
this simple device demonstrates capacitive touch sensors in a fun, tactile way.
https://www.adafruit.com/products/2024
https://learn.adafruit.com/adafruit-mpr121-12-key-capacitive-touch-sensor-breakout-tutorial/wiring
https://www.arduino.cc/en/Tutorial/ToneKeyboard?from=Tutorial.Tone3

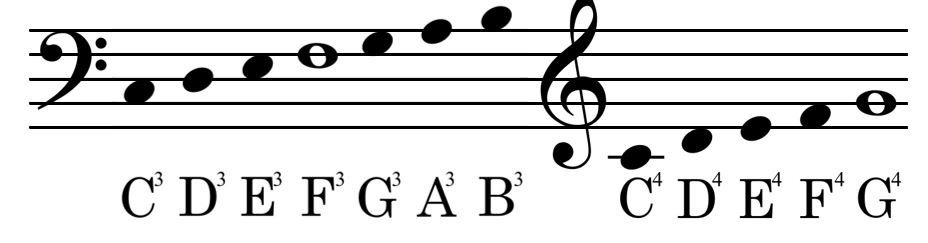

Go ahead, play some music!
Banana Piano Program
//Banana Piano
//By Jason Groce
//Revision 1.0 Date 2015-10-01
//https://learn.adafruit.com/adafruit-mpr121-12-key-capacitive-touch-sensor-breakout-tutorial/wiring
//https://www.arduino.cc/en/Tutorial/ToneKeyboard?from=Tutorial.Tone3
#include <Wire.h>
#include "Adafruit_MPR121.h"
#define NOTE_C3 131
#define NOTE_D3 147
#define NOTE_E3 165
#define NOTE_F3 175
#define NOTE_G3 196
#define NOTE_A3 220
#define NOTE_B3 247
#define NOTE_C4 262
#define NOTE_D4 294
#define NOTE_E4 330
#define NOTE_F4 349
#define NOTE_G4 392
Adafruit_MPR121 cap = Adafruit_MPR121();
int spkrPin = 9;
int notes[] = {
NOTE_C3, NOTE_D3, NOTE_E3,
NOTE_F3, NOTE_G3, NOTE_A3,
NOTE_B3, NOTE_C4, NOTE_D4,
NOTE_E4, NOTE_F4, NOTE_G4
};
void setup() {
cap.begin(0x5A); //
Start the MPR121 chip
}
void loop() {
for (int i=0; i<12; i++) { // Go through each of the 12
sensors
if (cap.touched() &
_BV(i)) { // Check if the sensor is
touched
tone(spkrPin,notes[i],20); // If so, play the corresponding note
}
}
}
Gardenbot
Automatic Aquaponic Arduino
Through the combined effort of a
light level detection with a photoresistor module (see below), a moisture
sensor (honestly, it’s two nails and some programming), and some relays ($3
eBay), we have a fully functional (and scalable) aquaponics system!
Whether
on the kitchen counter, or controlling an entire greenhouse, this basic system
is capable of some amazing stuff at minimal effort. Automatic watering when the plant is thirsty,
automatic lighting when it gets dark, and expandable to add further features as
you see fit, this template design is perfect for the beginner in home
aquaponics and microcontrollers alike!
Notice the LED grow light; these are
specifically designed to give the most usable light for the least cost. This light contains two 650 nm Red LEDs, two
450 nm Blue LEDs, and one 700 nm Red LED colors, which provide specially
targeted colors to ensure less light is wasted and more is absorbed by plants.
There are many claims made
regarding grow lights in regards to “photosynthetically active radiation,”
including:
420-500nm wavelength (blue) light provides
the largest proportion of chlorophyll and carotenoid absorption, and has the greatest
impact on photosynthesis.
620-750nm wavelength (red) light provides
high chlorophyll absorption rates, and has a significant influence on the
photosynthesis and photoperiod effects.


(http://www.ext.colostate.edu/mg/gardennotes/142.html)
The LED bulb used in this project
is 10 watts, which comes to less than 0.1 amps of consumption. Our water pump is only 3 watts. With our 15 amp outlets (and 25 amp relays),
we could power 150 lights and 450 water pumps.
Additional Sources:
Gardenbot Program
//Gardenbot
//By Jason Groce
//Revision 1.0 Date 2015-10-01
int moisturePin = A0;
int photoresistor = 9;
int lightRelay = 6;
int waterRelay = 7;
int darkTime = 3000;
int dryTime = 3000;
long previousDarkMillis = 0;
long previousDryMillis = 0;
void setup() {
pinMode(moisturePin, INPUT);
pinMode(photoresistor, INPUT);
pinMode(lightRelay, OUTPUT);
pinMode(waterRelay, OUTPUT);
}
void loop() {
unsigned long currentMillis =
millis(); //current time
if(digitalRead(photoresistor)
== LOW){ //if light detected
previousDarkMillis =
currentMillis; //reset
counter to 0
}
if(currentMillis -
previousDarkMillis > darkTime) { //if
counter greater than darkTime
digitalWrite(lightRelay, HIGH); //lights on
} else {
digitalWrite(lightRelay,
LOW); //else lights off
}
if(analogRead(moisturePin) <
1000) { //if water detected
previousDryMillis =
currentMillis; //reset counter to 0
}
if(currentMillis -
previousDryMillis > dryTime) { //if counter greater than dryTime
digitalWrite(waterRelay,
HIGH); //water on
} else {
digitalWrite(waterRelay,
LOW); //else water off
}
}
Human
Battery
Power
Through Copper and Zinc
It all began in 1800 with the “Voltaic Pile,” the first
effective electrical battery, created by Alessadro Volta. Layers of copper and zinc, with an
electrolyte placed between, produce an electrochemical effect, which dissolves
part of the zinc discs and deposits the zinc ions on the copper discs. This frees some electrons to travel through
the circuit.
An easy
way to do this at home is to use pennies.
Since pennies are copper on the outside and zinc inside, you can file
the pennies down on one side and expose the zinc. Then stack them with cardboard soaked in
lemon juice or vinegar to make your own Voltaic Pile.


This
is the same way “Lemon
Batteries” and similar science tricks work.
Batteries” and similar science tricks work.

Now for the secret: you can use
dozens of combinations of metals with many kinds of liquid to do the same
thing! This even works with using a
person as the “acid”, oddly enough! Just
hold a strip of zinc in one hand, a strip of copper in the other, connect these
up to a multimeter, and watch the power
flow through you!
Brain-Computer Interface
One
Part Hacked MindFlex Headset, One Part Arduino, All in Your Head
(Source: http://www.frontiernerds.com/brain-hack)
The
Mind Flex provides eight values representing the amount of electrical activity
at different frequencies. This data is heavily filtered / amplified, so where a
conventional medical-grade EEG would give you absolute voltage values for each
band, NeuroSky instead gives you relative measurements which aren’t easily
mapped to real-world units. A run down of the frequencies involved follows,
along with a grossly oversimplified summary of the associated mental states.
·
Delta (1-3Hz): sleep
·
Theta (4-7Hz): relaxed, meditative
·
Low Alpha (8-9Hz): eyes closed, relaxed
·
High Alpha (10-12Hz)
·
Low Beta (13-17Hz): alert, focused
·
High Beta (18-30Hz)
·
Low Gamma (31-40Hz): multi-sensory
processing
·
High Gamma (41-50Hz)
In
addition to these power-band values, the NeuroSky chip provides a pair of
proprietary, black-box data values dubbed “attention” and “mediation”. These
are intended to provide an easily-grokked reduction of the brainwave data, and
it’s what the Force Trainer and Mind Flex actually use to control the game
state. We’re a bit skeptical of these values, since NeuroSky won’t disclose how
they work, but a white paper
they’ve released suggests that the values are at least statistically
distinguishable from nonsense.
Here’s
the company line on each value:
·
Attention:
Indicates
the intensity of a user’s level of mental “focus” or “attention”, such as that
which occurs during intense concentration and directed (but stable) mental
activity. Distractions, wandering thoughts, lack of focus, or anxiety may lower
the Attention meter levels.
·
Meditation:
Indicates
the level of a user’s mental “calmness” or “relaxation”. Meditation is related
to reduced activity by the active mental processes in the brain, and it has
long been an observed effect that closing one’s eyes turns off the mental
activities which process images from the eyes, so closing the eyes is often an
effective method for increasing the Meditation meter level. Distractions,
wandering thoughts, anxiety, agitation, and sensory stimuli may lower the
Meditation meter levels.
MORE INFO TO COME!
Sunday, September 20, 2015
We're on YouTube!
Sagebrush 4-H Robotics now has our own YouTube channel, and our first video has just been uploaded! Watch to find out how crystals became light bulbs, how toasters relate to circuit protection, and how fishing can be used to describe electricity!
Monday, July 6, 2015
Archive (2014-2015)
The links below are for the 78 page lesson plan used in the 2014-2015 Robotics meetings. Please feel free to download, print, and share these however you wish. If you have any questions, contact the author, Jason Groce.
(Note: The files are in .PDF format. You will need a PDF reader, such as Adobe Reader, to view them.)
2014-2015 Introduction
Session 1
Session 2
Session 3
Session 4
Session 5
Session 6
Session 7
Additional Files
The links below are to the files used to program the Arduino microcontroller throughout the lessons.
(Note: Many of these files are in .ZIP compressed format.)
Friday, October 24, 2014
2014-2015 Session
This is Halloween... Robotics!

This time, we discussed Animatronics and the "Uncanny Valley."

We began working with Arduino microcontrollers, and made our first circuits to create color-changing eyes for Jack O' Lanterns.


(Note: A PDF reader, such as Adobe Reader, is needed to view this file.)
BONUS:
Click this link to download the code used in this month's project.
I encourage you to check out the Sources page at the end of the Handout, especially the YouTube videos at the end:
Next time: electronic music from pencils.
I encourage you to check out the Sources page at the end of the Handout, especially the YouTube videos at the end:
Pierre Jaquet-Droz’s Robot Boy, circa 1768 - https://www.youtube.com/watch?v=ckNn3m6ta0o
The REAL Wall-E Robot - https://www.youtube.com/watch?v=OJiMUzJHYFk
Everything You Need To Know About Arduino - https://www.youtube.com/watch?v=E6KwXYmMiak
Arduino PWM RGB LED Colour Fade Program - https://www.youtube.com/watch?v=EL38x9fugPw
Next time: electronic music from pencils.

Wednesday, October 8, 2014
2014-2015 Session 1
Welcome back and welcome all, old and new friends, to our second year with 4H Robotics!
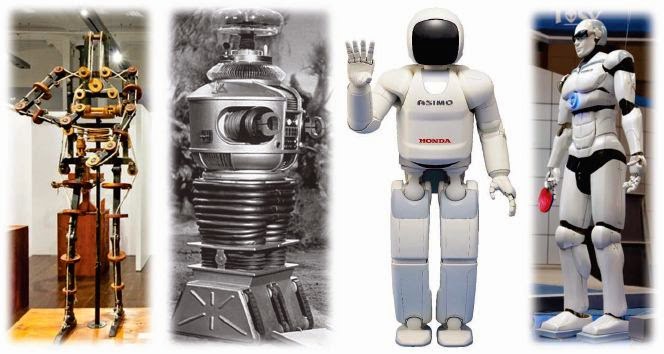
As each session nears, I will be uploading the handout files here in case someone misses anything or wants to try to work on their own.
For this first session, all you really need is a battery pack (4 AA batteries is what we used), a resistor (220 Ohm preferred) and an LED.

Click HERE for the Session 1 Handout (PDF)
(Note: A PDF reader, such as Adobe Reader, is needed to view this file.)
Feel free to check out the Sources page at the end of the Handout; there's a bunch of interesting links about robotics and electronics for you to explore! (I suggest starting from the bottom and go up.)
Next time: we light up the night for Halloween.

As each session nears, I will be uploading the handout files here in case someone misses anything or wants to try to work on their own.
For this first session, all you really need is a battery pack (4 AA batteries is what we used), a resistor (220 Ohm preferred) and an LED.
Click HERE for the Session 1 Handout (PDF)
(Note: A PDF reader, such as Adobe Reader, is needed to view this file.)
Feel free to check out the Sources page at the end of the Handout; there's a bunch of interesting links about robotics and electronics for you to explore! (I suggest starting from the bottom and go up.)
Next time: we light up the night for Halloween.

Thursday, June 12, 2014
Archive Lessons (2013-2014)
The links below are for the 72 page lesson plan used in the 2013-2014 Robotics meetings. Please feel free to download, print, and share these however you wish. If you have any questions, contact the author, Jason Groce.
(Note: The files are in .PDF format. You will need a PDF reader, such as Adobe Reader, to view them.)
Robotics Intro
Lesson 1
Lesson 2
Lesson 3
Lesson 4
Lesson 5
Lesson 6
Lesson 7
Lesson 8
Lesson 9
Lesson 10
Lesson 11
Lesson 12
(Note: The files are in .PDF format. You will need a PDF reader, such as Adobe Reader, to view them.)
Robotics Intro
Lesson 1
Lesson 2
Lesson 3
Lesson 4
Lesson 5
Lesson 6
Lesson 7
Lesson 8
Lesson 9
Lesson 10
Lesson 11
Lesson 12
Welcome to Robotics


Entering our second year for Sagebrush 4-H is the ROBOTICS PROGRAM!
Lead by Information Technology specialist and entrepreneur Jason Groce, members will learn the basics of engineering technology and robotics. Projects will include experimenting with circuits and robots using LEDs, resistors, motors, sensors, solar power, transistors, microcontrollers, and even radio controlled "BattleBots!" Beginning with the basics, members will gain a working knowledge of electricity and electronic components. As their understanding grows, members will be encouraged to 'think outside the box' and create their own robots!

Stay tuned for a preview of things to come!
Sagebrush 4H's Website:


For more information on 4H and the Robotics program, visit:
http://www.4-h.org/
http://www.4-h.org/youth-development-programs/4-h-science-programs/engineering-technology/4-h-robotics-program/
http://www.4-h.org/resource-library/curriculum/4-h-robotics/

Subscribe to:
Posts (Atom)